 International
 Singapore
 Malaysia
 Thailand
 Vietnam
Your shopping cart is empty!

Maker Mini Sumo with PS2 Controller
- Khairul_Tajudin
- 20 May 2024
- Tutorial
- Beginner
- 1247
Introduction
Building a sumo robot is a great way to get into robotics and electronics. It's a fun and engaging project that allows you to learn about programming, motor control, and sensor technology. This tutorial will guide you through creating a sumo robot using a Maker Mini Sumo controller and a standard PS2 controller for control.
Why a PS2 controller?
PS2 controllers are popular choices for hobbyist robots due to their affordability, ease of use, and widely available modding guides and parts.
What you'll learn in this tutorial:
- How to wire a Maker Mini Sumo controller to a PS2 controller
- How to program the Maker Mini Sumo controller for basic sumo robot movements (forward, backward, left, right)
- Calibrating your PS2 controller for sumo robot control
Component Used
- Maker Mini Sumo Controller
- Wireless PS2 Controller (Compatible)
- Breakout Board PS2 Connector or PS Connector (Female)
- Male to Female Jumper Wire
- Straight Pin Header (Male) 1x40 Ways
- PKCELL Heavy Duty AAA Battery
Wire Connection
In this section, we'll connect our PS2 controller to the Maker Mini Sumo controller, giving you remote control over your sumo robot. Here's what you'll need for connection:
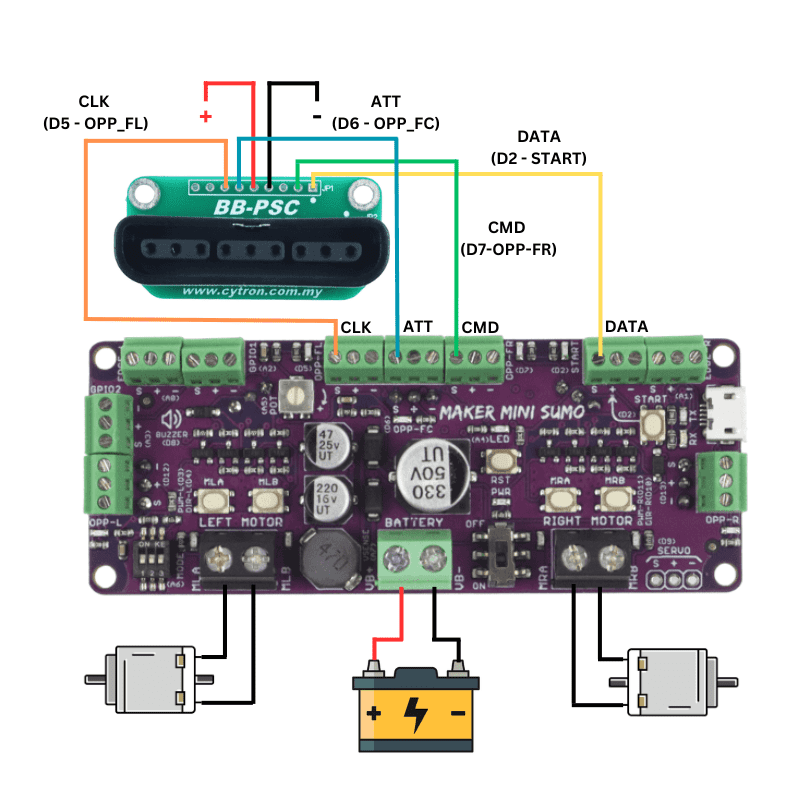
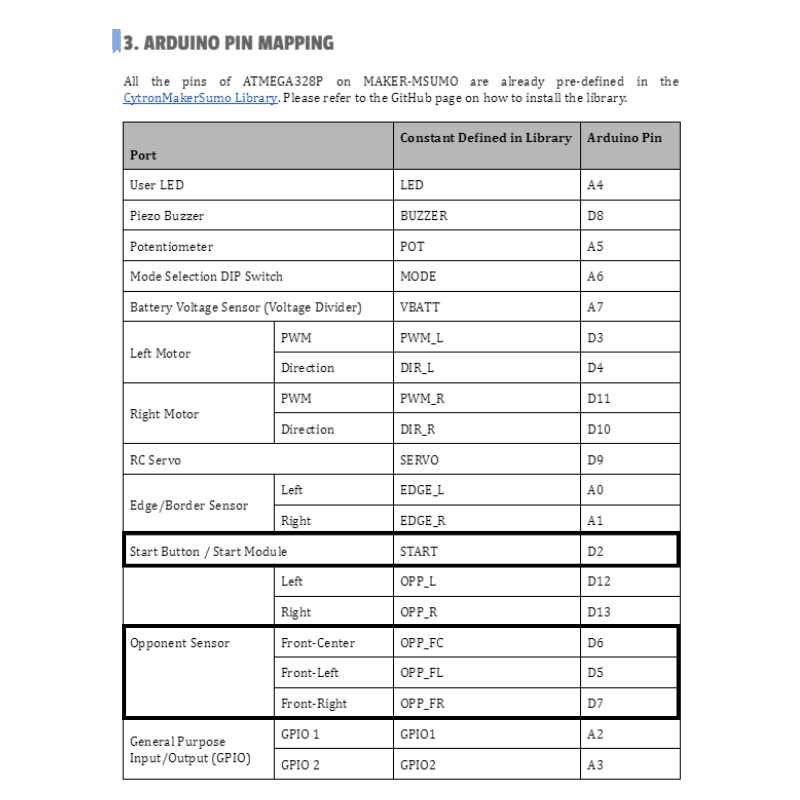
Locate the pinout diagram for the Maker Mini Sumo and PS2 controllers. These diagrams will show you which pins on each controller correspond to specific functions.
DATA - D2 (START)
CMD - D7 (OPP_FR)
ATT - D6 (OPP_FC)
CLK - D5 (OPP_FL)
+5V - Any +ve terminal on board
GND - Any -ve terminal on board
Programming
For this project we used Arduino IDE for programming the Maker Mini Sumo Controller board.
1. Download and install Arduino IDE latest version
You can find the latest version for Windows, Linux or MAC OSX on Arduino's website: https://www.arduino.cc/en/main/software
Download it for free, install it on your computer and launch it.
2. Adding the libraries
In this project, we use the Arduino PS2X library.
Download the library at https://github.com/madsci1016/Arduino-PS2X. There are two methods can use to insert the library.
Method 1: Insert the library into Arduino IDE through Sketch >> Include Library >> Add .Zip Library
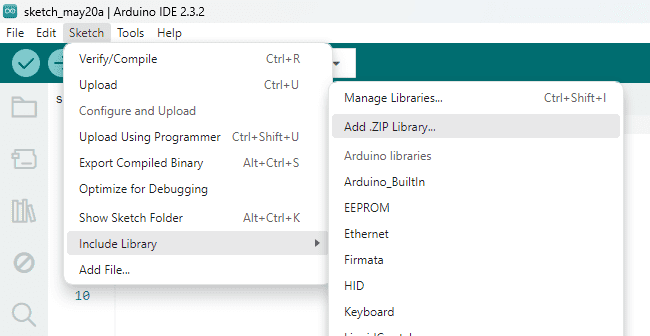
Method 2: Insert library into Arduino library folder
Step 1: Unzip Arduino-PS2X-master.zip
Step 2: Open directory > Downloads\Arduino-PS2X-master\Arduino-PS2X-master
Step 3: Copy folder "PS2X_lib"
Step 4: Open directory > Documents\Arduino\libraries
Step 5: Paste folder "PS2X_lib" into libraries folder
Step 6: Restart your Arduino IDE, and open the sketch
3. Download The Code
Download the basic code PS2Controller_Basic from this link PS2 Controller Basic Code. To integrate Maker Mini Sumo with the PS2 Controller library, we need to adjust the PS2 Controller Basic Code.
Otherwise, you can get the FULL CODE (Already adjusted for Maker Mini Sumo) here before we go step by step to configure this controller.
4. PS2 Configuration
The wireless controller works with 2.4GHz frequency, and it has a range of 10 meters. It also has an optical indicator for sending and receiving data. This controller needs only 2 AAA batteries for power.
5. FULL CODE Explanation
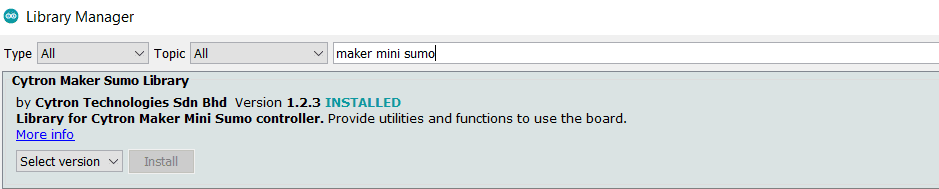
i) Cytron Maker Sumo Library
#include "CytronMakerSumo.h"
Library that we will use along this program. Need to include the library by searching Cytron Maker Sumo Library
ii) Additional variable
bool run_state = false;
To recognize the state of the button either it has pressed or released.
iii) Active Maker Sumo Library
MakerSumo.begin();
To activate the library of maker sumo controller
iv) PS2 Gamepad Configuration
Due to clash of configuration of pin, we need to change the original configuration which is ps2x.config_gamepad(13,11,10,12, true, true);
to ps2x.config_gamepad(5, 7, 6, 2, true, true);
We have refer to the Datasheet of Maker Mini Sumo on Arduino Pin Mapping to set the configuration pin
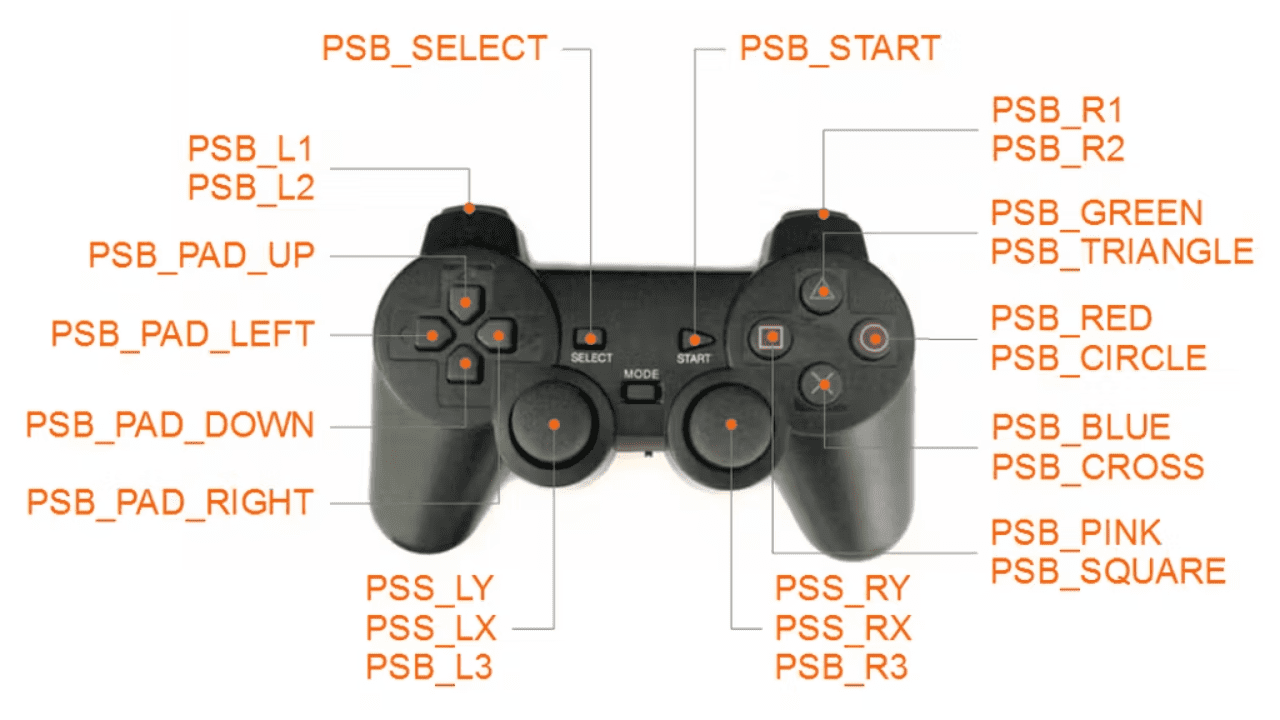
v) DualShock Controller
If we are using Wireless PS2 Controller (Compatible), it will be recognized as DualShock Controller. We will only insert our instruction in this loop.
if (ps2x.Button(PSB_PAD_UP)) {  //will be TRUE as long as button is pressed
 Serial.print("Up held this hard: ");
 Serial.println(ps2x.Analog(PSAB_PAD_UP), DEC);
 forward();
 run_state = true;
 }

else if (ps2x.Button(PSB_PAD_RIGHT)) {
 Serial.print("Right held this hard: ");
 Serial.println(ps2x.Analog(PSAB_PAD_RIGHT), DEC);
 right();
 run_state = true;
 }

else if (ps2x.Button(PSB_PAD_LEFT)) {
 Serial.print("LEFT held this hard: ");
 Serial.println(ps2x.Analog(PSAB_PAD_LEFT), DEC);
 left();
 run_state = true;
 }

else if (ps2x.Button(PSB_PAD_DOWN)) {
 Serial.print("DOWN held this hard: ");
 Serial.println(ps2x.Analog(PSAB_PAD_DOWN), DEC);
 backward();
 run_state = true;
 }

else if (run_state == true) {
 stop();
 run_state = false;
}
In ps2x.Button(PSB_PAD_UP) we insert a forward() function to give instruction to the PS2 to make the robot move forward.
Same goes for other functions such as right(), left() and backward().
vi) Call Function
void forward(){
Serial.print("FORWARD");
MakerSumo.setMotorSpeed(MOTOR_L, 100);  // Left motor forward
MakerSumo.setMotorSpeed(MOTOR_R, 100);  // Right motor forward
}

void backward() {
Serial.print("BACKWARD");
MakerSumo.setMotorSpeed(MOTOR_L, -100);  // Left motor backward
MakerSumo.setMotorSpeed(MOTOR_R, -100);  // Right motor backward
}

void left() {
Serial.print("LEFT");
MakerSumo.setMotorSpeed(MOTOR_L, -100);  // Left motor backward
MakerSumo.setMotorSpeed(MOTOR_R, 100);   // Right motor forward
}

void right() {
Serial.print("RIGHT");
MakerSumo.setMotorSpeed(MOTOR_L, 100);   // Left motor forward
MakerSumo.setMotorSpeed(MOTOR_R, -100);  // Right motor backward
}

void stop() {
//Serial.print("STOP");
MakerSumo.setMotorSpeed(MOTOR_L, 0);   // Left motor forward
MakerSumo.setMotorSpeed(MOTOR_R, 0);  // Right motor forward
}
We will use all this call function for navigation in Sumo Robot.
vii) Let's fight!
Upload your code into the robot. Connect PS2 with Maker Mini Sumo Controller by switch on PS2 controller and power up Maker Mini Sumo Controller. Press the reset button after connect to start control the robot.
Place your robot in the gamefield and ready to fight!
This tutorial is designed for beginners with some basic knowledge of electronics and programming. By following the steps in this guide, you'll be well on your way to building your very own PS2 controlled sumo robot! Feel free to reach us if have any issue on this tutorial. Thank you!
Hardware Components

x 1 unit(s)
")
x 1 unit(s)
-268x268.jpg "PS Connector (Female)")
PS Connector (Female)
RM3.00
x 1 unit(s)
 Best Seller
Male to Female Jumper Wire
RM2.00
x 1 unit(s)

Breakout Board PS2 Connector
RM9.00
x 1 unit(s)
 Out Of Stock
x 1 unit(s)
")
x 1 unit(s)
 by Cytron") New
NewRobot Battle (500g) by Cytron
RM669.00
x 1 unit(s)
Related Posts

Let’s Upgrade your Mini Sumo to 1kg Sumo Robot
This tutorial is specially designed for robotics enthusiasts that are excited about 1kg Sumo Robot. Let’s start on this journey!..
Build 1KG RC Sumo Robot using MDDRC10
This is a RC Sumo Robot based on MDDRC10 Motor Driver. The sizes are 15cm(L) x 15cm(W) with below 1kg (weight). The spec is for 1kg Sumo Robot Competition..