 International
 Singapore
 Malaysia
 Thailand
 Vietnam
Your shopping cart is empty!

Multicolor 3D Printing with Ender 3
Overview
Multicolor 3D printing using a single extruder is quite easy. However, getting a near-perfect prints are quite a challenge. Some problems you might encounter when trying to do multicolor 3D printing are:
- Z-axis moved when changing filaments.
- Over-extrusion when continuing the print. (blobs)
- Excessive stringing when printing logos or texts.
- The resume temperature is fixed.
If the Z-axis position is off, the nozzle will collide with the already printed part or it will print on nothing. Some cases, the print appears to be scratched by the different color filament, since the Z-hop distance is not enough to counter the Z displacement. There are ways to counter these problems without changing the g-code manually, that is by enabling draft shield for that particular print and adjusting the retraction settings. But it still does not solve the Z-axis displacement and the resume temperature. In this tutorial, you will learn how to manually fix the g-code.
Components Used
*The printer used in the video is Creality Ender 3 Pro but don't worry. The following setting guide in Cura still the same for Artillery 3D Printers
Print Settings
In this tutorial, we're going to use Ultimaker Cura to generate the gcode. The version used in this tutorial is version 4.12.1. Download the software here.
Before trying to manually edit the g-code, we need to make sure that the print settings are correct for our 3D printer and for the printed object itself. Usually when printing small texts, the slicer will not slice it if it is thinner than the nozzle size, in our case being 0.4mm. The settings that we need to look out for are:
- Line Width
- Print Thin Walls
A good practice when finding the best settings for 3D printing is to change one thing at a time, so that you know which settings work for your prints and which settings are causing problems, if any. In this case, I would try enabling the "Print Thin Walls" first. If it's not enough, then I will slightly decrease the line width. Figure below shows the effects of tuning the above parameters. As you can see, the logo and text are more complete after changing the settings.
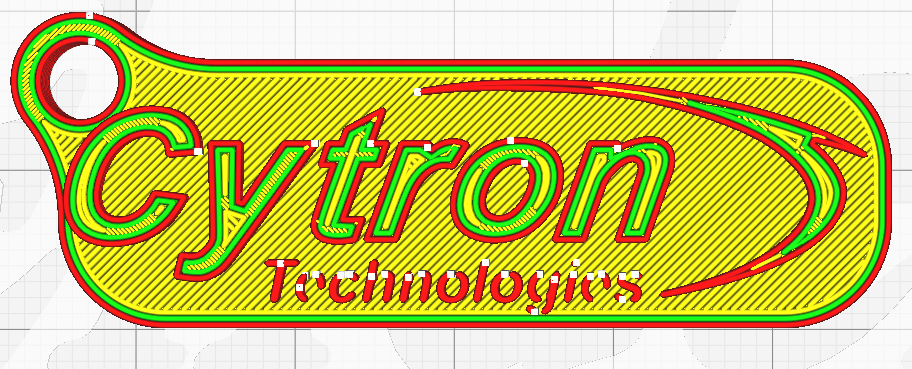
0.4mm Line Width & "Print Thin Walls" disabled (Default Settings)
0.37mm Line Width & "Print Thin Walls" enabled. Changes shown in blue.
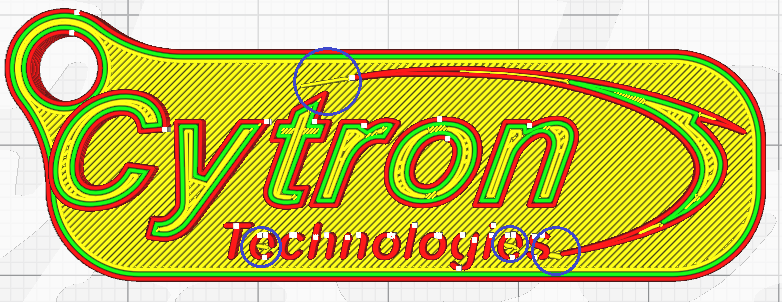
Next, the retraction settings should be configured so that the logos and texts are printed cleanly. Without the correct settings, the stringing issue will mess up the logos/texts to the point that cleaning it up takes more time than printing a new one. To minimize stringing effect, the settings you should look out for are:
- Retract at Layer Change (Enabled)
- Retraction Distance (4-7mm)
- Retraction Speed (25-60mm/s)
- Z-Hop (Enabled)
- Combing Mode (Depends on the printed object)
- Nozzle Temperature (Too hot will cause stringing)
It might be a good idea to validate these settings using a stringing test print, which you can download on Thingiverse here. You can scale down the height of the object to save your filament.
"Pause at Height" Script
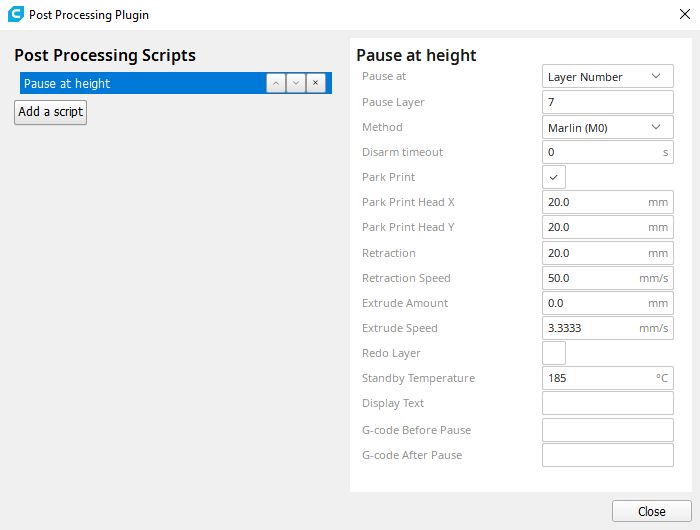
Now that the print settings are on point, we can now add the pause command to change the filament. Slice your object, and check which at what layer the printer should pause. The layer number that you should enter in the script is the final layer before changing the filament, i.e. before the logos/texts appear. In this case, it is the 7th layer, as shown below.

7th Layer
To add the "Pause at Height" script, go to the Extensions > Post Processing > Modify G-Code. Click Add a Script and choose Pause at Height. Enter 7 as the pause layer, 20mm for retraction and 50mm/s for retraction speed. The retraction settings in here is important to tell the extruder to pull out the filament before pausing, so that you can easily pull out the filament before the nozzle cools down. Enter the temperature for the next filament as standby temperature, in this case, it is 185. Also, you can add as many pauses you require depending on how many different colors you want.
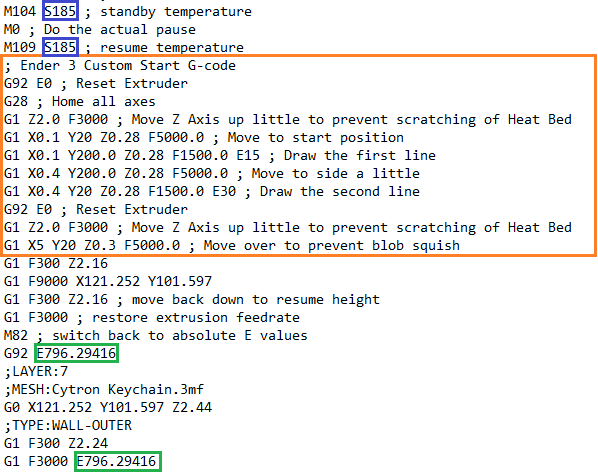
Editing G-Code
After saving the g-code, open it using notepad or any text editor. Find the pause command by pressing CTRL+F and typing "pause" or "M0". Delete the unnecessary lines, marked in red. Change the resume temperature to the standby temperature, marked in blue. Change the extrusion distance to the continued value, marked in green.
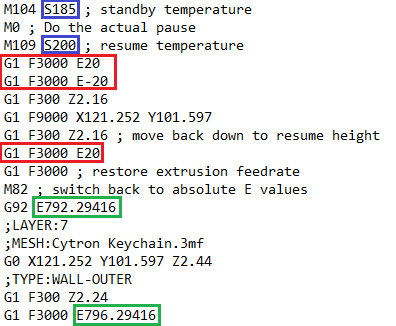
Next, copy the start g-code (can be found at Settings > Printer > Manage Printers > Machine Settings). Then paste it after the resume temperature command. Start g-code is marked with orange.
You're all set! Save the g-code to the SD card and happy printing! :)
References
- Multi-Color 3D Print in CURA 3 on Creality Ender 3
- Gcode | Marlin Firmware (marlinfw.org)
- Best Ender 3 (Pro/V2) Retraction Settings to Stop Stringing | All3DP
Related Products
 Backorder Only
x 1 unit(s)
 -7%
-7%Creality Ender-3 V3 SE 3D Printer + 1KG PLA
RM997.00 RM1,072.00
x 1 unit(s)