 International
 Singapore
 Malaysia
 Thailand
 Vietnam
Your shopping cart is empty!

Installation for 8MP Pan Tilt Zoom Camera on Raspberry Pi
- Abdul Salam A Haris
- 22 Dec 2022
- Tutorial
- 331
Hardware setup:
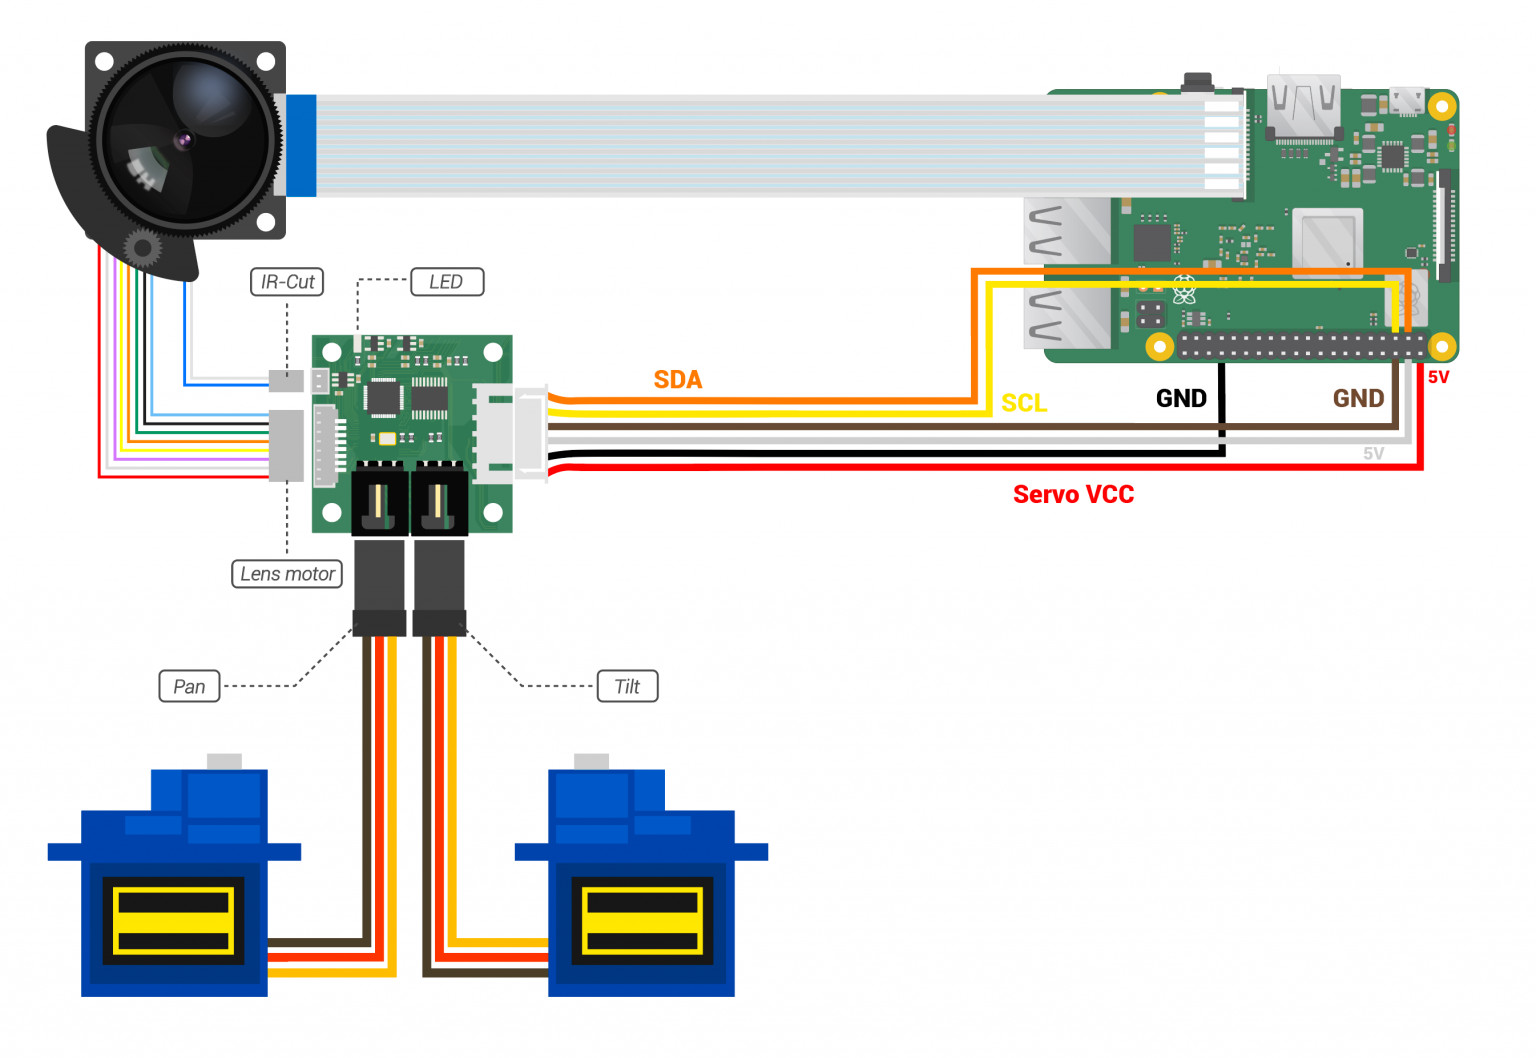
Image obtain from ArduCam.com, if you are using Ubuntu you can visit ArduCam for further details.
Software setup:
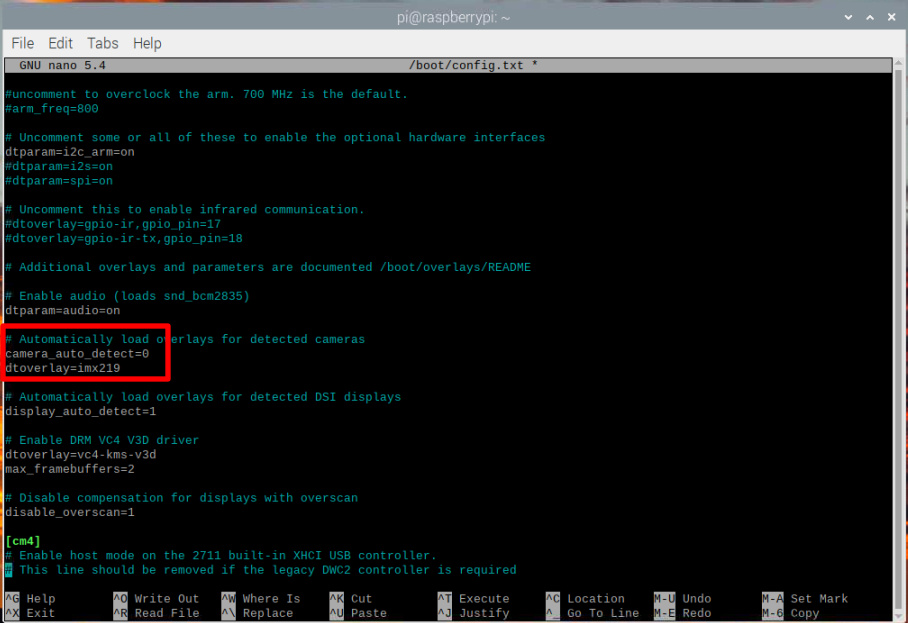
1. Testing the camera is working:
Modify configuration file:
sudo nano /boot/config.txt
Find the line: camera_auto_detect=1 , change it to camera_auto_detect=0
Add:
dtoverlay=imx219
Starts the camera, displays a preview window for a few seconds:
libcamera-hello2. Update python pip:
python -m pip install --upgrade pip
3. Install OpenCV:
sudo apt-get install python3-opencv
4. Download the Source Code:
git clone https://github.com/ArduCAM/PTZ-Camera-Controller.git
This command will pull the commit code at the date before 2023-01-01:
cd PTZ-Camera-Controller/
git checkout $(git rev-list --before="2023-01-01" master | head -n 1)
5. Installing dependencies:
(For Raspberry Pi less than 2GB RAM, warning this installation may require a lot of memory resources, please close other application during this step)
sudo apt-get update && sudo apt-get upgrade

sudo apt install -y cmake

sudo apt install libyaml-dev

sudo apt install libpng-dev

sudo apt install -y libcamera-dev libepoxy-dev libjpeg-dev libtiff5-dev

sudo apt install -y python3-pip git

sudo pip3 install jinja2

sudo apt install -y libboost-dev

sudo apt install -y libgnutls28-dev openssl libtiff5-dev

sudo apt install -y qtbase5-dev libqt5core5a libqt5gui5 libqt5widgets5

sudo apt install -y meson

sudo pip3 install pyyaml ply

sudo pip3 install --upgrade meson

sudo apt install -y libglib2.0-dev libgstreamer-plugins-base1.0-dev

sudo apt install -y cmake libboost-program-options-dev libdrm-dev libexif-dev

sudo apt-get install python-opencv

sudo apt-get install python3-smbus
6. Compiling libcamera:
Make sure to return to root directory first before installation.
cd
git clone git://linuxtv.org/libcamera.git

cd libcamera
This command will pull the commit code at the date before 2023-01-01:
git checkout $(git rev-list --before="2023-01-01" master | head -n 1)
Build the libcamera libraries:
(For Raspberry Pi less than 2GB RAM, warning this installation may require a lot of memory resources, please close other application during this step)
meson build --buildtype=release -Dpipelines=raspberrypi -Dipas=raspberrypi -Dv4l2=true -Dgstreamer=enabled -Dtest=false -Dlc-compliance=disabled -Dcam=disabled -Dqcam=enabled -Ddocumentation=disabled -Dpycamera=enabled

ninja -C build   # use -j 2 on Raspberry Pi 3 or earlier devices

sudo ninja -C build install
Check your python version:
python --version
Adding dynamic link libraries to __int_py will not copy successfully
Please edit the python version and the account name in the code below:
sudo cp -r ~/libcamera/build/src/py/libcamera/ /usr/local/lib/python3.9/dist-packages/

sudo rm /usr/local/lib/python3.9/dist-packages/libcamera/__init__.py

sudo bash -c 'cat /home/#your account name#/libcamera/build/src/py/libcamera/__init__.py >> /usr/local/lib/python3.9/dist-packages/libcamera/__init__.py'

7. Compiling libcamera-apps:
Make sure to return to root directory first before installation.
cd
git clone https://github.com/raspberrypi/libcamera-apps.git

cd libcamera-apps
This command will pull the commit code at the date before 2023-01-01:
git checkout $(git rev-list --before="2023-01-01" main | head -n 1)
(For Raspberry Pi less than 2GB RAM, warning this installation may require a lot of memory resources, please close other application during this step)
mkdir build

cd build

cmake .. -DENABLE_DRM=1 -DENABLE_X11=1 -DENABLE_QT=1 -DENABLE_OPENCV=0 -DENABLE_TFLITE=0

make -j4  # use -j1 on Raspberry Pi 3 or earlier devices

sudo make install

sudo ldconfig # this is only necessary on the first build
8. Compiling python-kms++:
Make sure to return to root directory first before installation.
cd
git clone https://github.com/tomba/kmsxx.git

cd kmsxx
This command will pull the commit code at the date before 2023-01-01:
git checkout $(git rev-list --before="2023-01-01" master | head -n 1)
(For Raspberry Pi less than 2GB RAM, warning this installation may require a lot of memory resources, please close other application during this step)
git submodule update --init

sudo apt install libfmt-dev

meson build

sudo ninja -C build install

sudo cp -r ~/kmsxx/build/py/pykms/ /usr/local/lib/python3.9/dist-packages/

sudo ldconfig
9. Installing picamera2:
sudo apt install -y python3-pyqt5 python3-prctl libatlas-base-dev ffmpeg python3-pip

pip3 install numpy --upgrade

pip3 install picamera2
10. Enable i2c:
cd
cd PTZ-Camera-Controller
sed -i -e 's/\r$//' enable_i2c_vc.sh
./enable_i2c_vc.sh
Reboot your Raspberry Pi.
11. Run the Example:
cd PTZ-Camera-Controller
sudo python3 FocuserExample.py
You should obtain results below:

Use your arrow key to adjust the focus and zoom on the camera.
Hardware Components

x 1 unit(s)
 -11%
-11%Raspberry Pi 4 Model B 4GB RAM for Student ONLY
Discontinued
x 1 unit(s)