 International
 Singapore
 Malaysia
 Thailand
 Vietnam
รถเข็นของคุณว่างเปล่า!

LED blinking is the first lesson for most microcontroller/electronics starters. Same as Raspberry Pi, the GPIO pins on a Raspberry Pi are a great way to interface physical devices like buttons and LEDs with the little Linux processor. The first lesson should be easy to start. So, for this tutorial, I will use serial command line, no LCD monitor, no web browser and GUI. For programming, I will use Python.
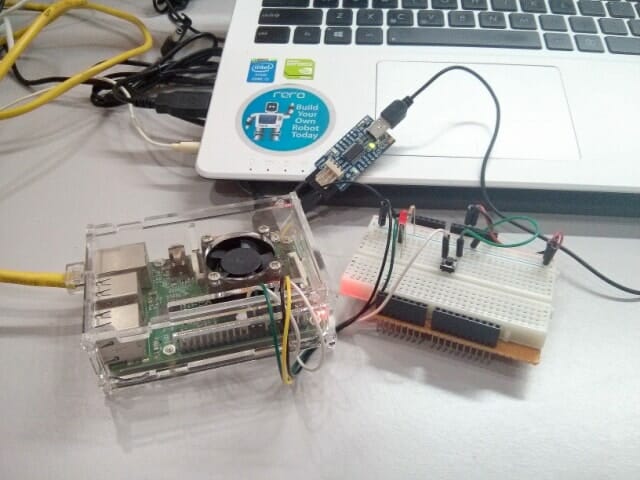
HARDWARE
1. Raspberry Pi + 8GB SD Card (Raspbian image)
2. USB To UART Converter + USB MiniB Cable (2.0)
3. Dual USB DC Adapter 2.1A + USB Micro B Cable
3. Breadboard
4. Jumper Wire
5. LED
6. Resistor
SOFTWARE
PuTTY.
STEPS
1. Write the latest Raspbian image into 8GB SD card using Win32DiskImager. Slot into Raspberry Pi.
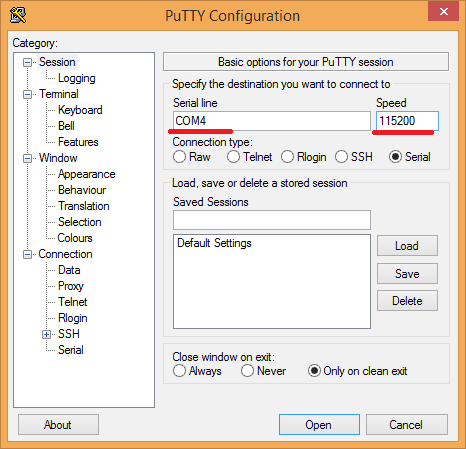
2. Download PuTTY and open it (Note: no installation required). Connect UC00A to PC and it should be detected as COM port. Set your COM number and baudrate to 115200 bps. Click Open.
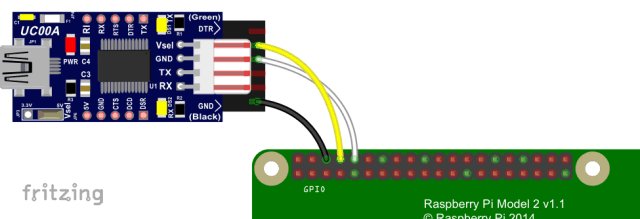
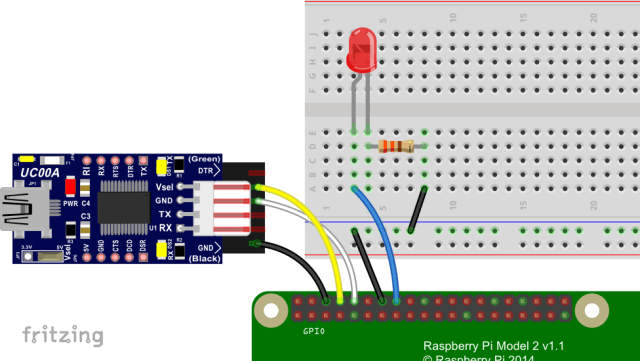
3. Connect UC00A’s transmit, receive and ground pins to Raspberry Pi.
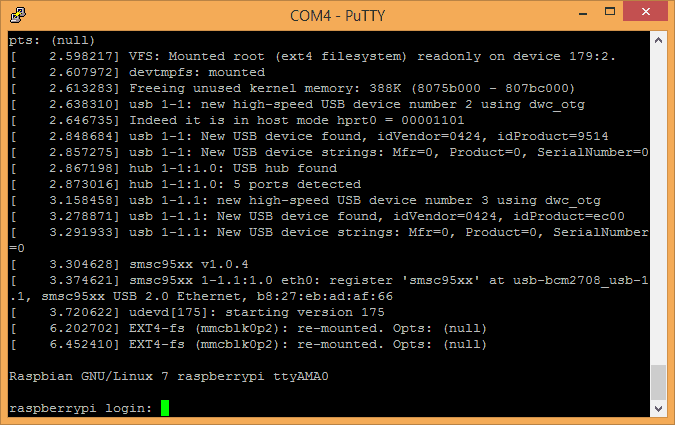
4. Connect LAN cable to Raspberry Pi (internet is a must) and power it up. Wait until boot complete. Default login is pi and raspberry for password.
5. It is better to update and upgrade the Raspberry Pi first. Type:
[code lang=”c” highlight=””]sudo apt-get update
sudo apt-get upgrade[/code]
6. Then install Python and Raspberry Pi RPi.GPIO Python library. FYI, the newest version of Raspbian has the RPi.GPIO library pre-installed. Type:
[code lang=”c” highlight=””]sudo apt-get install python-dev
sudo apt-get install python-rpi.gpio[/code]
7. Ok now lets proceed with LED blinking. Connect the LED (to gpio-23) and 330Ω resistor as shown below. You can refer to this link for Raspberry Pi GPIO numbers.
8. Create new python file, LED_Blinking.py. Type:
[code lang=”c” highlight=””]sudo nano LED_Blinking.py[/code]
Then write the following code. When complete press CTRL+X and then Y.
[code lang=”c” highlight=””]import RPi.GPIO as GPIO
import time
GPIO.setwarnings(False)
GPIO.setmode(GPIO.BCM)
GPIO.setup(23, GPIO.OUT)
try:
while True:
GPIO.output(23, GPIO.HIGH)
time.sleep(0.5)
GPIO.output(23, GPIO.LOW)
time.sleep(0.5)
except KeyboardInterrupt:
GPIO.cleanup()[/code]
To run the code, type:
[code lang=”c” highlight=””]sudo python LED_Blinking.py[/code]
Now, your LED should blinking at 500ms. To terminate the program press CTRL+C.
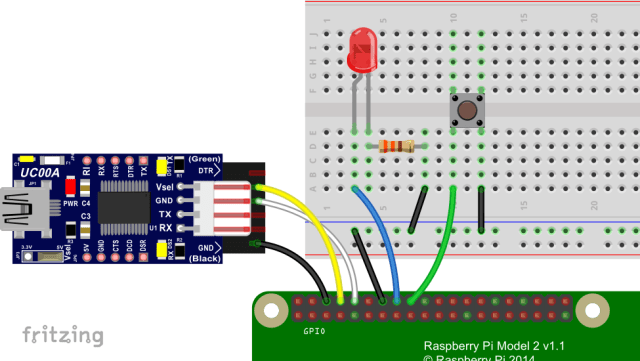
9. How about controlling the LED using a switch? Lets try. Connect switch to gpio-24 as shown below.
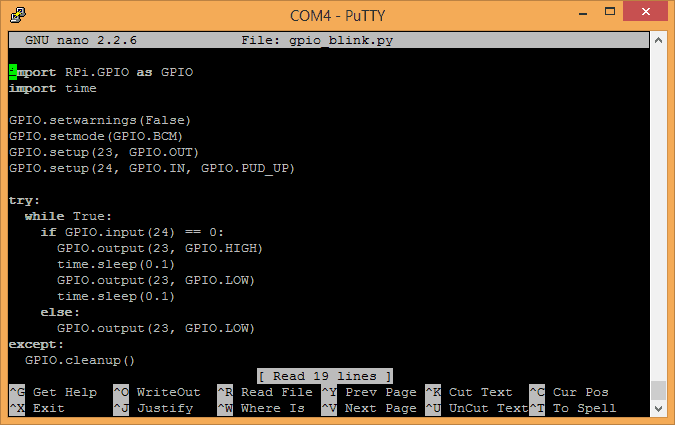
10. Repeat step 8 to edit the code. Then run the code and test it.
[code lang=”c” highlight=””]import RPi.GPIO as GPIO
import time
GPIO.setwarnings(False)
GPIO.setmode(GPIO.BCM)
GPIO.setup(23, GPIO.OUT)
GPIO.setup(24, GPIO.IN, GPIO.PUD_UP)
try:
while True:
if GPIO.input(24) == 0:
GPIO.output(23, GPIO.HIGH)
time.sleep(0.5)
GPIO.output(23, GPIO.LOW)
time.sleep(0.5)
else:
GPIO.output(23, GPIO.LOW)
except KeyboardInterrupt:
GPIO.cleanup()[/code]
Ok, that’s all. If you have any question, feel free to ask in our technical forum as we seldom check the tutorial’s comment section. Thank you.
REFERENCES
Credit to:
1. Raspberry Pi: Python scripting the GPIO by scottkildall
2. Raspberry Pi GPIO by Jimbo
3. Tutorial: Raspberry Pi GPIO Pins and Phyton by Mark Kleback